
How To Redirect Users To A Different Language Based On Geolocation In WordPress
From WPML to Polylang to Weglot, there are lots of great WordPress translation plugins to help you create a multilingual website.
But while these plugins make it easy to translate your content into another language, they usually require users to manually click a language switcher button to change to their preferred language. Or, if you're lucky, they might allow you to redirect users based on browser language, but not a user's actual geolocation.
But if you've ever looked at how many large websites do it, many actually redirect users to the proper language based on geolocation, not browser language. For example, Google automatically redirects Vietnamese IP addresses from google.com → google.com.vn in Vietnamese:
To help you get similar redirect functionality for your WordPress site, I'm going to show you how to redirect users to a different language translation on your WordPress site using their IP address and geolocation.
Table of Contents
What You Need To Redirect Users To Different Language Based On Geolocation
To redirect users to a different translation on your site based on their geolocations, you can use the Geo Redirects addon from Geotargeting WP.The plugin will work with any WordPress translation plugin, including:
- WPML
- Polylang
- Loco Translate
- GTranslate
- Weglot
- Etc.
Basically, as long as your translation plugin creates a separate version of your website for translations (e.g. vn.yourwebsite.com/post or yourwebsite.com/vn/post), Geo Redirects can help you redirect users to the proper translation.
To get started, make sure you've installed and activated the GeotargetingWP plugin, and activate Geo Redirects addon. Then, here's how to set it up:
Step 1: Create New Redirect And Set Redirect Rules
To get started, go to GeoTargetingWP → Geo Redirects and click Add New:

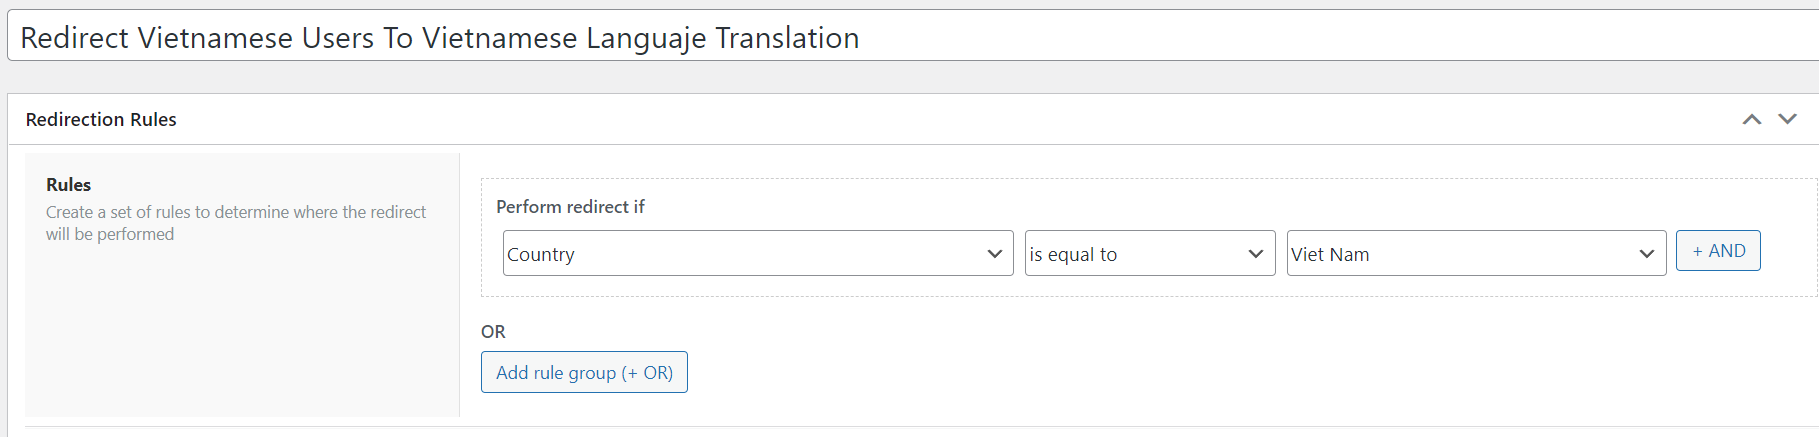
Give your redirect a name so that you can remember it. Then, look for the Redirect Rules area.
The Redirect Rule(s) essentially define what conditions will trigger the redirect.
Geo Redirects lets you redirect users based on a number of different conditions. But for this specific use, you'll likely want to choose Country from the drop-down.
Then, in the is equal to section, select the country that you want to target your redirect towards:
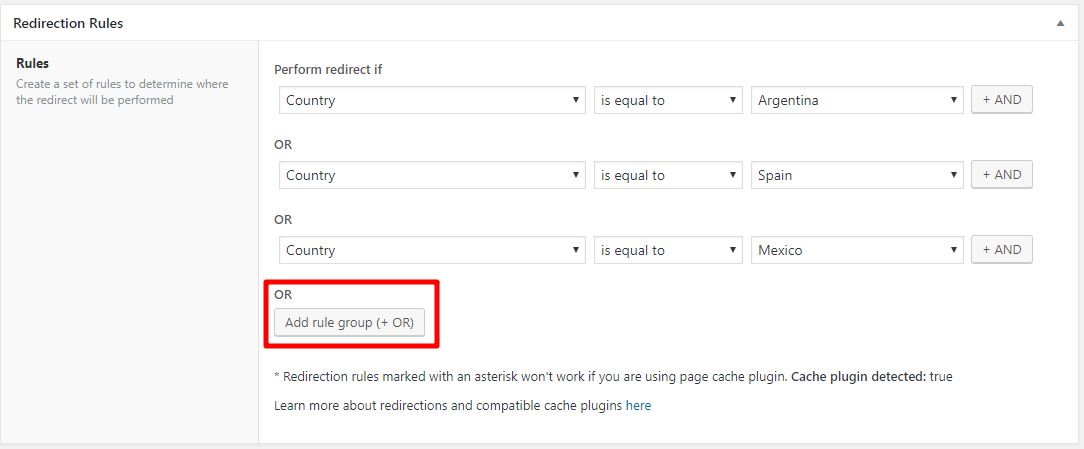
It's also possible to target multiple countries at the same time by using the OR condition.
Because of this functionality, you can set up your redirects in a couple more creative ways. You can create:
- One redirect for each translation language. For example, you could create a redirect with "Spain", "Argentina", "Mexico", etc. and have them all redirect to the Spanish translation of your site.
- A single redirect for all languages and then dynamically redirect users to their actual country code (more on this in the next section). Just be aware that this will not work for languages where the country speaks a different language than its 2-letter ISO country code. For example, Argentina would go to "ar" instead of "es".
To perform either method, just make sure to use OR, not AND. Then, include every country that you want to target :
Step 2: Configure Redirection Options
Once you've chosen which countries you want to target your redirect for, you can scroll down to the Redirection Options area.
The most important setting here is the Destination URL. Geo Redirects lets you use dynamic placeholders to redirect users. This is important because it ensures that you can redirect users to the exact same page in the relevant language and offer a great user experience:
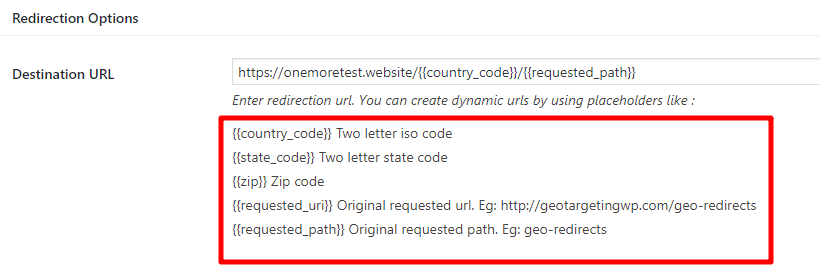
The format of your Destination URL depends on the URL structure for the translated versions of your pages.
If you're using a subfolder with two-letter ISO codes, you'll want to redirect users to:
https://yourdomain.com/{{country_code}}/{{requested_path}}
This means that anyone who visits:
https://yourdomain.com/example-post
Will get redirected to:
https://yourdomain.com/vn/example-post
If you're using subdomains with two-letter ISO codes, you'll want something more like this:
https://{{country_code}}.yourdomain.com/{{requested_path}}
You can even use the same placeholders to redirect users to an external site if you're using different domains for your translated sites.
If you're not using the two-letter ISO code to form the translated URLs, you should set up separate redirects for each translation and hardcode the translated URL instead of using the {{country_code}} placeholder.
Below that, you can configure:
- Exclude child pages from redirect? When this option it's marked,child pages of destination url will be excluded from the redirect
- One time redirect? - how often to redirect the user. For this type of redirect, you should choose either "Yes" or "Yes, one per user session".
- Remove two letters codes from this redirect? Use this option if you redirect from two letter directories such as /uk/ to others two letter directories using the {{request_path}} dynamic shortcode to automatically remove the code from the path.
- Exclude Search Engines? - whether or not to redirect search engines.
- Pass query string?Query string parameter will be passed into the destination url
- Redirection code? - what redirect code to use.
- IP Whitelist - you can manually exclude certain IP addresses from the redirect.

Once you've finished, click Publish to make your redirect live.
Now, users should be automatically redirected to the proper translation based on their geolocation.
Powered by Froala Editor