
How to Combine WooCommerce Product Table with a Geolocation Plugin
Table of Contents
The Perfect Plugin Pair - Why WooCommerce Product Table Allies Brilliantly with Geotargeting Pro
In ecommerce, useful plugins are like gold dust. Once you spot one which makes a real difference to your online retail operations, you'll want to implement it quickly. So when you find two useful plugins which work together to bring double benefits, you're in business! The WooCommerce Product Table plugin has already made a big impact in ecommerce, providing an attractive, informative and uncluttered layout with a proven ability to increase sales. Up until now, WooCommerce Product Table would display the same product information nomatter where in the world a website was accessed from. But use it in tandem with Geotargeting Pro, and you have a plugin partnership to be reckoned with. That's because you'll be able to list products in a conversion-winning table layout, while tailoring its contents to a specific country or region.
 In this article, we'll show you how to combine these two plugins to great effect.
Getting Started
The first step, if you haven't already done so, is to get the WooCommerce Product Table plugin and create a table listing your products. So here goes:
- Install WooCommerce Product Table on your website.
- Go to WooCommerce > Settings > Products > Product tables in your WordPress admin and enter your licence key.
- Configure the settings to your liking.
- Create a page which will allow you to add product tables which are country-specific and add the shortcode:
[product table].
Let's Get Geotargeting
Now it is time to introduce Geotargeting Pro into the mix, using the following steps:
- Sign up for Geotargeting WP, and download the plugin.
- In the API Keys section of your account, copy the API Secret and API Key. Enter the domain of your ecommerce site at the bottom of the page.
- Download and install GeotargetingWP on your website.
- Paste your API Key and API Secret in the GeoTargetingWP section within your WordPress admin.
- Activate the features by clicking 'check licence'.
- Head to the next section and you will be able to restrict products based on the location of the user.
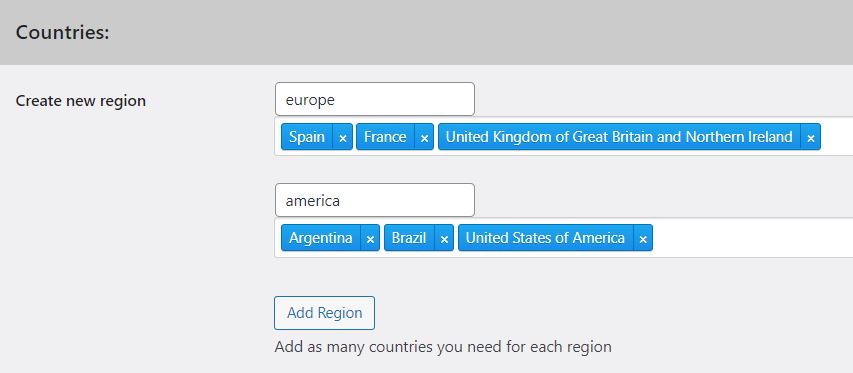
- The name of a specific region you want to create can be added in the 'Countries' section, which you will see on the Settings page. You can add countries to a regional grouping. There's also a 'Cities' section which gives you the option of tailoring product availability to each city.
- You can add geographical restrictions via the Edit Screen for each product. Go to the 'Product Data' section within GeoTargeting Options, before selecting the locations in which you want the products to be displayed (or hidden).
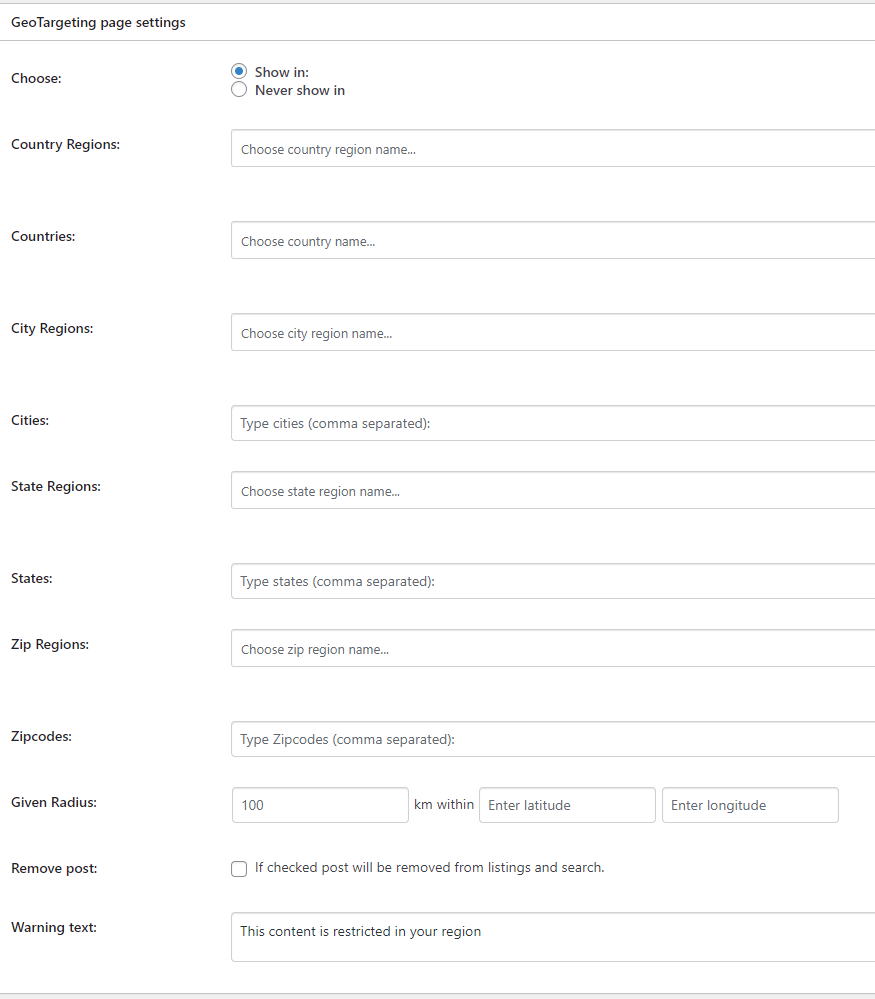
- To hide products from WooCommerce Product Table, tick the 'Remove post' box.


Time to Test
You should test that the two plugins are working in tandem, before rolling them out across your ecommerce site. You can do this by taking the steps below:
- Set a product from your WooCommerce Product Table to be visible for your own country, region or city.
- Now take a look at the WooCommerce Product Table to ensure that the product which you made visible is indeed visible for your correct location.
- Go back and set the same product to invisible for your current country, region or city. After that, refresh and have a look at the WooCommerce Product Table to confirm that the product is no longer present.

Troubleshooting
Are things not working as well as you had hoped they would? Try the troubleshooting tips below:
- Check that you are using the WooCommerce Product Table standard version and that the AJAX/lazy load option is not enabled.
- Disable caching on all pages where the product tables are currently being used. This could be a caching plugin installed on your site, caching implemented by your web host, or the caching option in WooCommerce Product Table.
- If you are still having issues, it's recommended you get in contact with Geotargeting Pro Plugin Support.
Did You Know You Can Categorize, Too?
The same principle for restricting items in your product tables by geographical location can also work with categories, allowing you to assign specific categories to specific countries. Here's how:
- Add products to a category.
- Make a WooCommerce product table for each category which you want to be country-specific, by adding the shortcode
[product_table category="italy"]for example. You can then swap Italy for whichever country you wish to assign to a certain category. - After that, wrap the product table shortcode you have created with the Geotargeting Pro shortcode. This tells the geolocation plugin to show or hide the table for users in that country.
- Add as many WooCommerce product tables as you like to the page, each wrapped in a different Geotargeting Pro shortcode. Each user will only see 1 product table, depending on which country they are in.

So those are the steps which you need to get Geotargeting Pro working in perfect synergy with WooCommerce Product Table. Once you are up and running, you can look forward to more strategic product listings which are able to up your conversion rates, while making your products more relevant to each specific location-based customer. Happy targeting!
Powered by Froala Editor